Posting in WordPress (Tutorial)
Here’s how to post in WordPress.
1. Navigate to the Dashboard. Sign in.
2. Start a new post by selecting “Posts,” then “Add New.”
3. Title your post something pithy.
4. Switch your view from “HTML” to “Visual,” so that you can see text and pictures the way that they’ll appear to the reader.
5. Check out the toolbars available to you in Visual mode. The default is one toolbar, but don’t forget, you can use the “Kitchen Sink” button, all the way on the right, to give yourself all possible options. (Definition of the idiomatic use of “kitchen sink” here.)
6. After you select “Kitchen Sink,” your new, second toolbar will allow you the option to select “Paste from Word.” If you are writing in a Word doc, use this window to paste, lest you bring in all kinds of formatting that will drive you crazy.
You’ll get this window:
7. Insert hyperlinks into your text like so: Navigate to the URL that you intend to insert. Copy this URL onto your clipboard.
Then, return to your WordPress post. Highlight the portion of text to which you plan to attach a hyperlink. The “hyperlink” button in your top toolbar will become selectable.
Click this button. You’ll get a pop-up window, where you’ll paste the URL that you copied, and check the “open link in a new window/tab” box. Don’t worry about filling out the “Title” field. Click “Add Link.”
The text you selected should now appear with an underline underneath it.
8. Insert pictures like so: Download the picture of your choice to your desktop. Save as a .jpg, .png, or .tif (.jpg will give you the least trouble).
Position your cursor in your text wherever you want your picture to appear.
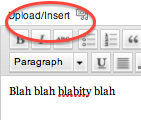
Select “Upload/Insert.”
A window will open. Upload your image, either by clicking on “Select Files” or dragging the file from your desktop into the space designated.
After uploading, you must insert a caption and choose size and alignment of the image. Include as much information in the caption about the picture as you have (when was it taken? photographer? site you took it from?). Captions are also a good place to insert a bit of humor, if you feel like it.
As for size, the size of your original file will limit your choices here. If you are desperately attached to an image, and the file is the wrong size to allow you to pick “Medium” as a size option (this is usually the best size of pictures for a blog post of 250 words in length), resize the file using Preview (in Mac), Picasa (Google’s photo editing software), or any photo editing software you choose.
If you want the reader to be able to click on the picture and arrive at a separate URL (maybe the URL of the place where you got the picture), clear the pre-filled field “Link URL” and insert the URL of your choice.
After you’ve selected size and alignment properties, and inserted a caption, choose “Insert into Post.”
Done!
9. Insert video like so: I’ve fixed the WP installation so that you can insert video, so this should now work for you.
Switch your post view from “Visual” to “HTML.”
Go to YouTube. Find the video you want to embed. Scroll down below the video window; below the controls for the video itself, you’ll find the toolbar. Select “share.”
 You’ll see a field with a URL. You’ll need to click one more button—”Embed”—to get to the HTML you can use to embed.
This is the view you want. Full HTML for your embedding convenience.
Copy this HTML to your clipboard, return to your WordPress post, check again to make sure you’re in the HTML view (not “Visual”), and paste it into your post. Save draft and preview to make sure it worked.
You can’t attach a caption to a video the same way you can with an image. To caption your video, insert a line of text underneath the video’s appearance in the text, and italicize the caption to set it off from the rest of your text.
10. Choose categories and tags. On the right-hand sidebar of Dashboard, select one of the three post categories, so that I know which type of post you are submitting. Scroll down and select at least three tags. If you click on “Choose from the most used tags,” you’ll see the ones that your classmates have already entered; select from these, or create new ones.
11. That’s it! Press the blue “Publish” button, make sure you get a confirmation of publication in a yellow box on top of your Dashboard post view, and you’re done…


